When you walk into your apartment after a long, hot day, you grab the remote, turn on your mini split AC, and instead of that refreshing cool breeze, you get a weak airflow and a strange odor. Not exactly what you were hoping for, right? That’s why it’s so important to keep your mini split clean. Let’s learn about the importance of cleaning your mini split air conditioner and how you can do it yourself step by step.
Importance of Cleaning Mini Splits
Like all appliances, mini splits will experience some form of wear and tear. With mini splits specifically, the unit can accumulate dirt and debris from dust, pet hair, pollen, and moisture, leading to mold and mildew growth. If not cleaned regularly, the unit starts working harder, leading to increasing energy bills, risks overheating, and can cause potential failure. Meanwhile, dirty filters and coils reduce air quality, worsen allergies and respiratory issues, and cause unpleasant odors.
Benefits of Maintaining a Clean Unit
-
Lower energy bills due to efficient operation.
-
Consistent and quick cooling for better comfort.
-
Extended lifespan, saving money on replacements.
-
Improved air quality, reducing allergy symptoms and respiratory issues.

How to Clean Mini Split Units?
Before you start cleaning your mini split, here are some essential preparations to ensure a safe and effective cleaning process:
-
Always turn off the power to the AC unit to avoid any electrical hazards.
-
Place a tarp or old towels under the indoor unit to catch any drips or debris. This helps keep your space clean.
-
Make sure the area is well-ventilated to avoid inhaling any cleaner fumes.
-
Prepare the mini split cleaning kit, including cleaning bag, fin comb, mini split coil cleaner, spray bottle, antifungal spray, soft brushes, microfiber cloths, drain line cleaning tool.
Next, let’s go through the steps for cleaning both the indoor and outdoor units of your mini split AC.
Indoor Units of Mini Split AC
-
Start by wiping the exterior of the unit with a damp cloth and then dry it with a clean cloth.
-
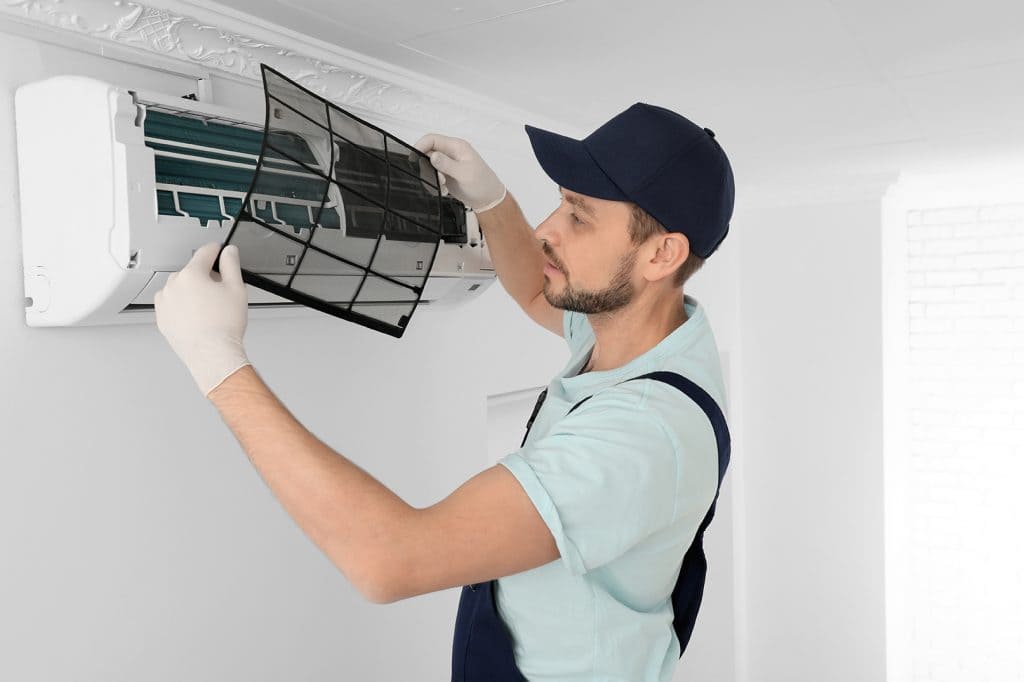
Carefully detach the front panel to access the filter.
-
Take out the filter and wash it with warm water and mild detergent. Rinse thoroughly and let it air-dry completely before putting it back.
-
Remove the unit’s cabinet to reach the evaporator coil. Use a coil cleaner or a soft, dry cloth to clean the surface of the evaporator coil.
-
Check the condensate pan and drain for mold or debris. Spray the dirty areas and let it sit for a few minutes, then use a damp cloth to wipe away the mold and cleaning solution.
-
Once everything is clean and dry, put the filters back in place, reattach the front panel, and secure the cabinet.
Outdoor Units of Mini Split AC
Now, let’s move on to the mini split outdoor unit:
-
Remove any leaves, grass, or dirt from around the mini split unit.
-
Use a garden hose or mini split coil cleaner to spray down the outside of the unit. Wipe off any grime with a damp cloth.
-
Scrub the grill with a brush or cloth. If possible, remove the grill and clean the fan blades with soapy water. Be gentle to avoid bending the blades. Rinse and dry the blades thoroughly to prevent rust.
-
Use a vacuum to suck up any dust and debris from inside the unit.
-
Spray the coils with a garden hose and use a coil cleaner to remove any dirt.
-
Check and clean the condensate pan and drain. Use a bleach solution if you notice mold growth, then rinse with water.
How Often to Clean Mini-Split Filters?
The answers are simple. You should clean the mini split air conditioner every 2-4 weeks or every 1-2 months.
During summer and winter when using mini split air conditioners often, it’s a good idea to clean the filters every 2-4 weeks.
During milder seasons when you’re not using the mini split unit as much, cleaning the filters every 1-2 months should be enough.
If you have pets, live in a dusty area, or suffer from allergies, you might need to clean the filters more often. Check them regularly and clean as needed.

Ask for Professional Help Clean Mini Split
By following the steps above, you can also finish the whole mini split units cleaning yourself. DIY cleaning can save money and help you stay on top of maintenance, but it requires time, effort, and the right tools to do the job effectively. On the other hand, professional cleaners bring expertise and specialized equipment to ensure a thorough job. But most importantly, your mini split can be thoroughly cleaned.
Check out our high-quality mini split heater AC units. Della's mini splits are designed for efficiency and reliability. Contact us today to learn more and get the perfect solution for your cooling and heating needs!
FAQ
How to Tell if My Mini Split AC Needs Cleaning?
You should clean your mini split if you notice reduced airflow, strange odors, increased energy bills, unusual noise, visible dirt and dust, or poor cooling performance. These signs indicate that your unit is dirty and needs maintenance to restore its efficiency and functionality.
How to Vacuum a Mini Split AC Thoroughly?
Vacuuming your mini split can help remove dust and debris from the unit, you can conduct it following the steps:
-
Turn off the unit power.
-
Remove the front panel to access the filters and interior components.
-
Attach a soft brush to your vacuum cleaner to avoid damaging the components.
-
Gently vacuum the filters to remove dust and debris.
-
Carefully vacuum the coils and other interior parts, being mindful not to bend or damage anything.
What Should I Do if My Mini-Split System Is Not Cooling Properly?
There are may a few reasons if your mini split isn’t cooling properly, please check out the list:
-
Check the Filters: Dirty filters can restrict airflow. Clean or replace them if necessary.
-
Inspect the Outdoor Unit: Ensure there’s no debris blocking the outdoor unit and that it has adequate clearance for proper airflow.
-
Check the Thermostat Settings: Make sure the thermostat is set to the correct temperature and mode.
-
Clean the Coils: Dirty coils can reduce cooling efficiency. Clean them if needed.
-
Check for Leaks: Low refrigerant levels due to leaks can affect cooling. If you suspect a leak, contact a professional for repair.
-
Professional Maintenance: If the above steps don’t resolve the issue, it’s time to call a professional technician to diagnose and fix the problem.
Related Reading:


LEAVE A COMMENT
All comments are moderated before being published.
This site is protected by hCaptcha and the hCaptcha Privacy Policy and Terms of Service apply.